布局宽度定制
模板宽度由网格定义,分为若干列(默认为12列)。
改变宽度的模板,打开文件:variables.less:templates/t3_bs3_blank/less 不改变模板定义宽度。
// Media queries breakpoints
// --------------------------------------------------

// Extra small screen / phone
// Note: Deprecated @screen-xs and @screen-phone as of v3.0.1
@screen-xs:                  480px;
@screen-xs-min:              @screen-xs;
@screen-phone:               @screen-xs-min;

// Small screen / tablet
// Note: Deprecated @screen-sm and @screen-tablet as of v3.0.1
@screen-sm:                  768px;
@screen-sm-min:              @screen-sm;
@screen-tablet:              @screen-sm-min;

// Medium screen / desktop
// Note: Deprecated @screen-md and @screen-desktop as of v3.0.1
@screen-md:                  992px;
@screen-md-min:              @screen-md;
@screen-desktop:             @screen-md-min;

// Large screen / wide desktop
// Note: Deprecated @screen-lg and @screen-lg-desktop as of v3.0.1
@screen-lg:                  1200px;
@screen-lg-min:              @screen-lg;
@screen-lg-desktop:          @screen-lg-min;
现在更改响应布局的大小。
这里是网格系统。你可以改变网格的数量。
- // Grid system
- // --------------------------------------------------
- // Number of columns in the grid system
- @grid-columns: 12;
- // Padding, to be divided by two and applied to the left and right of all columns
- @grid-gutter-width: 30px;
- // Point at which the navbar stops collapsing
- @grid-float-breakpoint: @screen-sm-min;
主题定制
所有主题文件夹都位于:templates/t3_bs3_blank/less/themes/
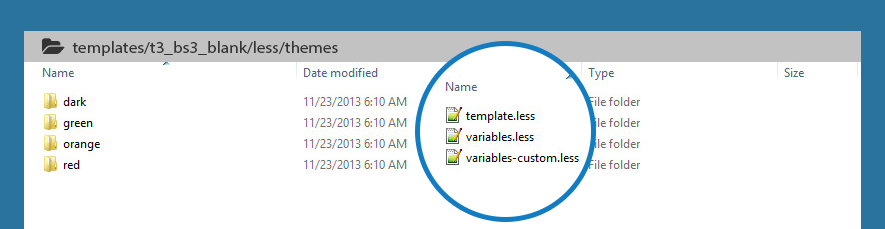
在每个主题文件夹中,它有3个文件:
1.template.less这个文件包括风格,定制默认主题。
- // Logo Text
- // ----------
- .logo-text h1 {
- color: @white;
- }
- // Taglines
- .logo-text .site-slogan {
- display: block;
- font-size: @font-size-base;
- margin-top: 5px;
- }
2.variables.less:此文件包含自定义变量的默认variables.less文件。
- // Global values
- // --------------------------------------------------
- @t3-base-img-path: "../../../images";
- @t3-theme-img-path: "@{t3-base-img-path}/themes/dark";
- // Scaffolding
- // -------------------------
- @body-bg: @gray-darker;
- @text-color: @gray-lighter;
3.variables-custom.less:此文件包含新的变量,创建自定义当前主题。
- // Links
- // -------------------------
- @link-color: lighten(@blue, 20%);
创建新的主题
创建新主题的最佳方法是拷贝主题文件夹。
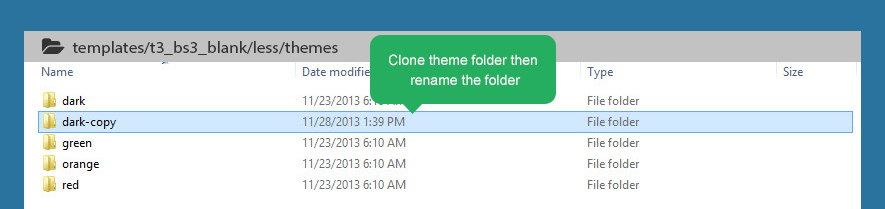
你可以手动创建新的主题文件夹,然后添加3个文件:template.less,variables.less和variables-custom.less
自定义主题
在后台,你可以选择新创建的主题风格你想自定义主题与thememagic。
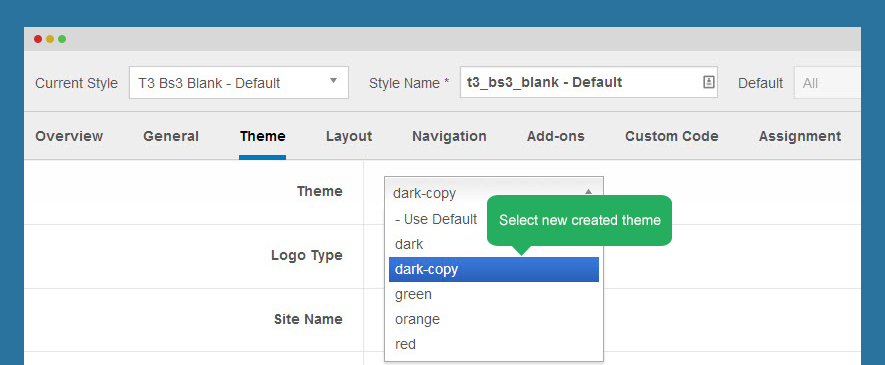
您可以自定义主题少文件创建的主题:templates/t3_bs3_blank/less/themes/dark-copy
编制less的CSS
在定制主题,请编译less、CSS。新的主题的CSS文件将位于templates/t3_bs3_blank/css/themes/dark-copy
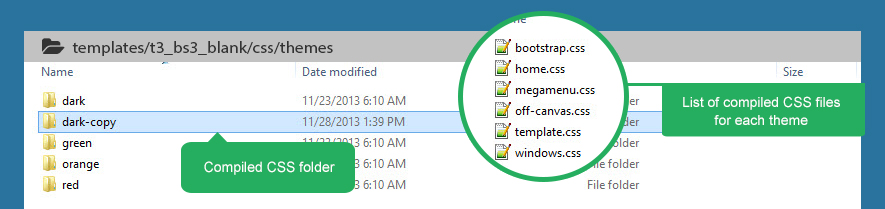
添加CSS文件:
bootstrap.css
home.css
megamenu.css
off-canvas.css
windows.css
所有添加的CSS文件将被加载时,网站运行的主题,通过这种方式,所有的文件都是从1个文件夹才可以提高站点的性能负载。
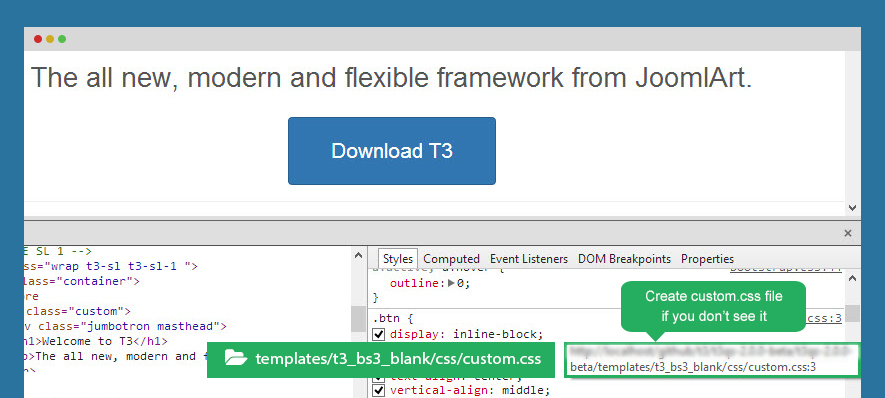
自定义模板的CSS
Custom.css文件位于:templates/t3_blank/css。如果你不看文件,创建新文件,然后打开文件添加CSS样式模板。

一些特点Custom.css文件
默认情况下不包含该文件,需要创建新文件。
该文件是在您的站点中加载的最后一个文件。
该文件不是一个编译文件从少所以不会被覆盖或丢失当你编译。
与文件工作 的Custom.css文件是其他任何CSS文件相同。
进入CSS样式模板。
- .show-grid {
- margin-top: 10px;
- margin-bottom: 20px;
- }
- .show-grid [class*="span"] {
- background-color: #eee;
- text-align: center;
- -webkit-border-radius: 3px;
- -moz-border-radius: 3px;
- border-radius: 3px;
- min-height: 40px;
- line-height: 40px;
- }
- .show-grid:hover [class*="span"] {
- background: #ddd;
- }
让我们检查前端
thememagic定制
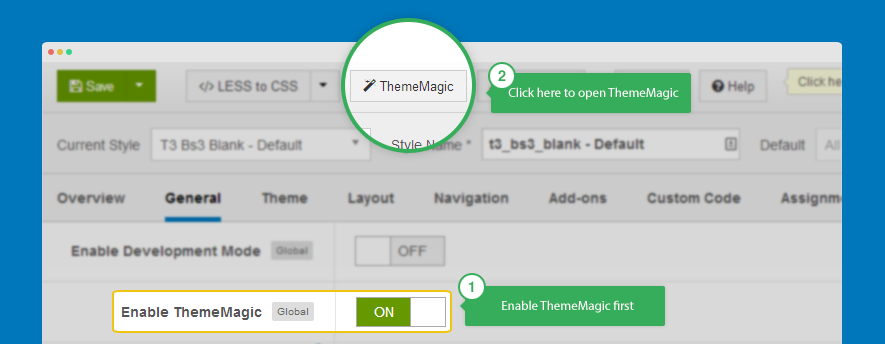
T3框架是强大的简单主题定制基于thememagic。您可以添加无限的参数定制。
你必须使thememagic第一,然后点击thememagic按钮打开thememagic面板。
工作面板
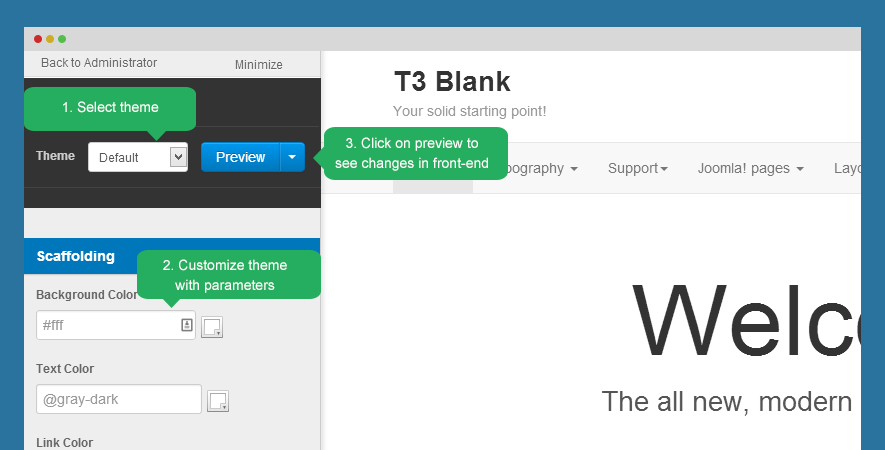
选择要自定义的主题
通过更改参数值自定义主题
点击预览查看更改
保存或保存为复制
自定义主题
添加新的参数
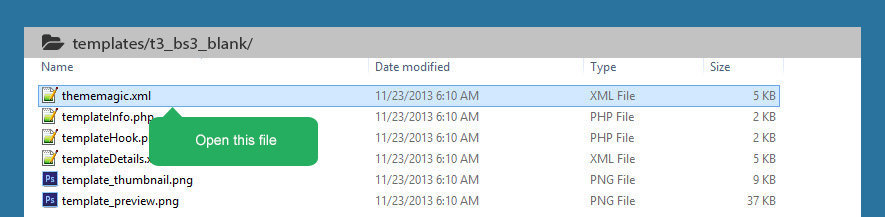
您可以添加无限的参数,主题定制组。定制的参数设置在文件夹中的文件thememagic.xml:templates/t3_bs3_blank
步骤1.定义一个新的组
- <fieldset name="custom1_params" label="CUSTOM1_LABEL">
- </fieldset>
- <fieldset name="module_params" label="T3_TM_MODULE">
- </fieldset>
步骤2.新组中定义参数
- <field name="@your-field-name"
- type="type-of-parameter"
- default="default-value-of-parameter"
- label="FIEL_LABEL"
- description="FIELD_DESCRIPTION" />
- </field>
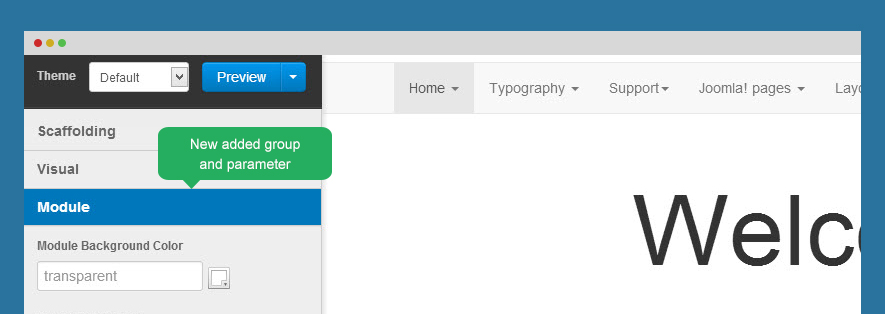
- <fieldset name="module_params" label="T3_TM_MODULE">
- <field name="t3-module-bg" type="color" class="t3tm-color" label="T3_TM_VARS_MODULE_BGCOLOR_LABEL" description="T3_TM_VARS_MODULE_BGCOLOR_DESC" />
- </fieldset>
步骤3.定义参数少
定义的参数少,具有相同的名称,如上述定义@your-field-name variables.less /template/less/。
- // Module General
- @t3-module-bg: transparent;
步骤4.在更少的文件中添加“@你的域名”
这取决于你,只是想你想如何使用这个参数,以及它如何影响到模板。你必须有一定的基础知识和CSS。我们建议你添加到文件:style.less
- .t3-module {
- background: @t3-module-bg;
- }
步骤5.定义语言的关键
打开模板en-GB.tpl_t3_bs3_blank.ini位于language\en-GB\语言文件和定义你使用以上语言的关键参数确定。
- ; MODULE
- T3_TM_MODULE ="Module"
- T3_TM_VARS_MODULE_BGCOLOR_LABEL ="Module Background Color"
检查是否有新的组和参数被添加
LOGO定制
1.改变标志形象
有2种方法来改变标志为T3框架开发的Joomla模板。
# 1:改变的logo模板管理
每一种风格都可以有不同的标志。要设置logo样式,请在模板样式设置中打开主题设置。
![]()
# 2:改变的标志从variable.less文件
另一种方式来改变这个标志是改变variables.less文件logo图像的路径,它位于templates/t3_blank/less。
- // T3 LOGO
- // --------------------------------------------------
- @T3logoWidth: 60px;
- @T3logoHeight: 50px;
- @T3LogoImage: "../images/logo.png";
2.logo造型
为标志的自定义风格,打开文件style.less位于templates/t3_blank/less文件夹。搜索logo文本,你会发现样式,您可以添加更多的样式或自定义它。
- // Logo
- // ---------------------------------------------------------
- .logo {
- float: left;
- a {
- display: inline-block;
- line-height: 1;
- margin: 0;
- }
- }
- // Logo Image
- // ----------
- .logo-image {
- overflow: hidden;
- a {
- background-image: url("@{T3LogoImage}");
- background-repeat: no-repeat;
- width: @T3logoWidth;
- height: @T3logoHeight;
- }
- //hide sitename and slogan
- span, small {
- display: none;
- }
- }
页脚信息定制
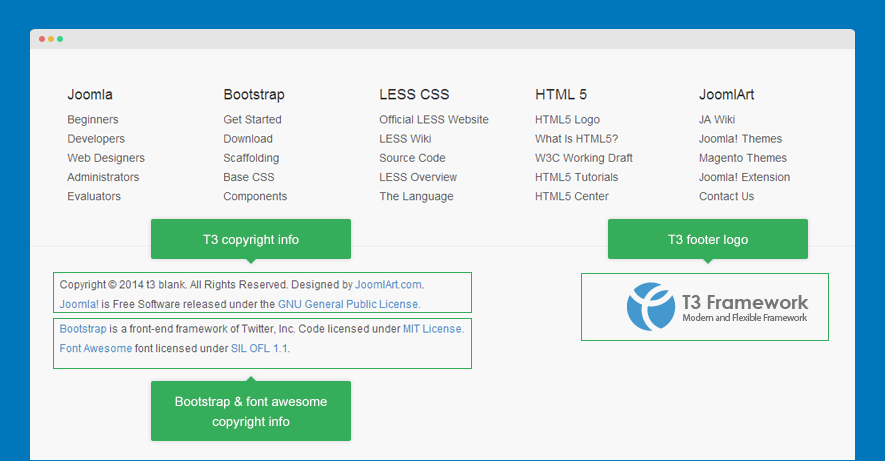
T3空白默认页脚信息包括3件事:
T3页脚标识
T3的版权信息
自定义版权信息
1.自定义页脚标识T3
# 1:如何禁用页脚标识?
禁用页脚标识,打开T3模板管理器,在General选项卡,禁用T3logo的选择
![]()
# 2:改变链接,T3页脚
打开footer.php文件位于 templates/t3_bs3_blank/tpls/blocks/,改变页脚标识链接,添加/更改类风格的logo…
![]()
- <?php if ($this->getParam('t3-rmvlogo', 1)): ?>
- <div class="col-md-4 poweredby text-hide">
- <a class="t3-logo t3-logo-color" href="http://t3-framework.org" title="<?php echo JText::_('T3_POWER_BY_TEXT') ?>"
- target="_blank" <?php echo method_exists('T3', 'isHome') && T3::isHome() ? '' : 'rel="nofollow"' ?>><?php echo JText::_('T3_POWER_BY_HTML') ?></a>
- </div>
- <?php endif; ?>
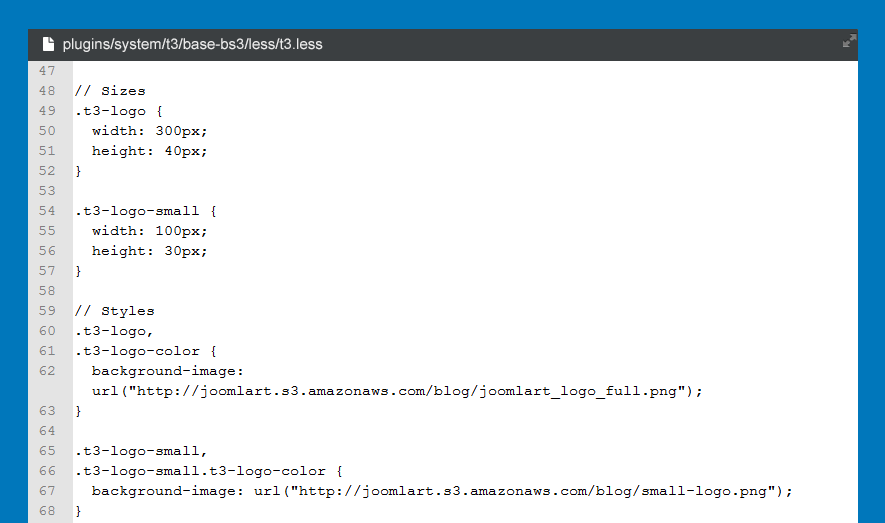
3:改变#页脚logo形象,大小和自定义风格
页脚的标志风格在t3.less文件位于plugins/system/t3/base-bs3/less。打开文件并自定义logo样式。
- // T3 Logo
- // ---------------------------------------------------------
- .t3-logo,
- .t3-logo-small {
- display: block;
- text-decoration: none;
- //text-indent: -9999em; - use text-hide
- text-align: left;
- background-repeat: no-repeat;
- background-position: center;
- }
- // Sizes
- .t3-logo {
- width: 182px;
- height: 50px;
- }
- .t3-logo-small {
- width: 60px;
- height: 30px;
- }
- // Styles
- .t3-logo,
- .t3-logo-color {
- background-image: url("http://joomlart.s3.amazonaws.com/images/jat3v3-documents/logo-complete/t3logo-big-color.png");
- }
- .t3-logo-small,
- .t3-logo-small.t3-logo-color {
- background-image: url("http://joomlart.s3.amazonaws.com/images/jat3v3-documents/logo-complete/t3logo-small-color.png");
- }
- .t3-logo-dark {
- background-image: url("http://joomlart.s3.amazonaws.com/images/jat3v3-documents/logo-complete/t3logo-big-dark.png");
- }
- .t3-logo-small.t3-logo-dark {
- background-image: url("http://joomlart.s3.amazonaws.com/images/jat3v3-documents/logo-complete/t3logo-small-dark.png");
- }
- .t3-logo-light {
- background-image: url("http://joomlart.s3.amazonaws.com/images/jat3v3-documents/logo-complete/t3logo-big-light.png");
- }
- .t3-logo-small.t3-logo-light {
- background-image: url("http://joomlart.s3.amazonaws.com/images/jat3v3-documents/logo-complete/t3logo-small-light.png");
- }
您可以更改logo图像,logo图像的大小…
- // Sizes
- .t3-logo {
- width: 300px;
- height: 40px;
- }
- .t3-logo-small {
- width: 100px;
- height: 30px;
- }
- // Styles
- .t3-logo,
- .t3-logo-color {
- background-image: url("http://joomlart.s3.amazonaws.com/blog/joomlart_logo_full.png");
- }
- .t3-logo-small,
- .t3-logo-small.t3-logo-color {
- background-image: url("http://joomlart.s3.amazonaws.com/blog/small-logo.png");
- }
前端外观
![]()
2。自定义T3版权信息
T3的版权信息在default.php文件放置在templates/t3_bs3_blank/html/mod_footer。打开文件和自定义T3版权信息。
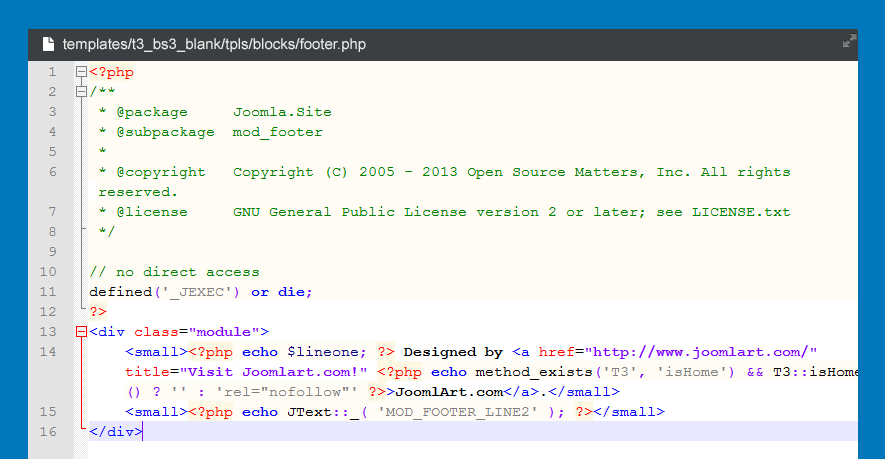
- <?php
- /**
- * @package Joomla.Site
- * @subpackage mod_footer
- *
- * @copyright Copyright (C) 2005 - 2013 Open Source Matters, Inc. All rights reserved.
- * @license GNU General Public License version 2 or later; see LICENSE.txt
- */
- // no direct access
- defined('_JEXEC') or die;
- ?>
- <div class="module">
- <small><?php echo $lineone; ?> Designed by <a href="http://www.joomlart.com/" title="Visit Joomlart.com!" <?php echo method_exists('T3', 'isHome') && T3::isHome() ? '' : 'rel="nofollow"' ?>>JoomlArt.com</a>.</small>
- <small><?php echo JText::_( 'MOD_FOOTER_LINE2' ); ?></small>
- </div>
3.自定义引导和字体版权信息
打开footer.php文件位于templates/t3_bs3_blank/tpls/blocks/然后自定义版权信息的引导和字体。
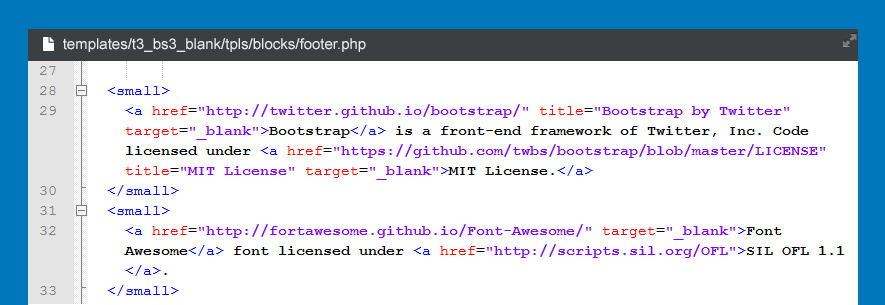
- <small>
- <a href="http://twitter.github.io/bootstrap/" title="Bootstrap by Twitter" target="_blank">Bootstrap</a> is a front-end framework of Twitter, Inc. Code licensed under <a href="https://github.com/twbs/bootstrap/blob/master/LICENSE" title="MIT License" target="_blank">MIT License.</a>
- </small>
- <small>
- <a href="http://fortawesome.github.io/Font-Awesome/" target="_blank">Font Awesome</a> font licensed under <a href="http://scripts.sil.org/OFL">SIL OFL 1.1</a>.
- </small>
添加/安装新字体
步骤1:添加字体包(S)
上传你的字体包(S)templates/t3_bs3_blank/font。
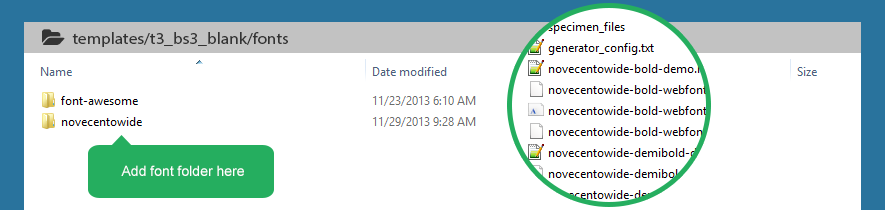
步骤2:定义字体
现在打开文件assets.xml位于 templates/template_folder/etc文件夹定义字体(S)你刚才添加的
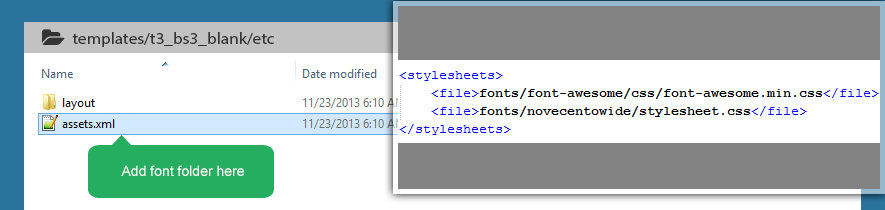
- <stylesheets>
- <file>fonts/font-awesome/css/font-awesome.min.css</file>
- <file>fonts/novecentowide/stylesheet.css</file>
- </stylesheets>
谷歌字体
T3框架支持谷歌字体,所有您需要做的就是定义谷歌的字体你想用在assets.xml文件(位于 templates/template_folder/etc)。
- <stylesheets>
- <file>http://fonts.googleapis.com/css?family=Roboto+Slab:400,100,300</file>
- </stylesheets>
嵌入的样式表和Javascript
增加新的样式和JavaScript的T3框架,有2种方法来做。你可以声明新的样式和JavaScript来head.php文件或assets.xml文件。
# 1.使用head.php文件
在模板/ t3_bs3_blank /供应商/块文件夹打开文件head.php,然后宣布新的样式和JavaScript的如你所愿的格式如下。
添加CSS样式表
- <?php
- // CUSTOM CSS
- if(is_file(T3_TEMPLATE_PATH . '/css/custom.css')) {
- $this->addStyleSheet(T3_TEMPLATE_URL.'/css/custom.css');
- }
- ?>
添加JavaScript
- <?php
- if(is_file(T3_TEMPLATE_PATH . '/templates/TEMPLATE-FOLDER-NAME/js/slider/lofslidernews.mt11.js')) {
- $this->addScript(T3_TEMPLATE_URL.'/templates/TEMPLATE-FOLDER-NAME/js/slider/lofslidernews.mt11.js');
- }
- ?>
只要复制然后正确路径的CSS和Javascript文件。
Joomla提供addstylesheet,addscriptdeclaration addScript,功能,这是你应该使用的。
# 2.使用assets.xml文件
另一种方法来添加新的CSS,Javascript嵌入他们assets.xml,位于templates/t3_bs3_blank/etc。 CSS样式表和字体
添加要嵌入到站点的样式表和字体的路径.。使用下面的格式:
- <stylesheets>
- <file>fonts/novecentowide/stylesheet.css</file>
- <file>http://fonts.googleapis.com/css?family=Roboto+Slab:400,100,300</file>
- </stylesheets>
Javascript
添加路径的Javascript文件要嵌入到你的网站。使用下面的格式:
- <scripts>
- <file>js/jquery.mousewheel.js</file>
- <file>js/iscroll.js</file>
- <file>js/script.js</file>
- </scripts>
覆盖404页和脱机页
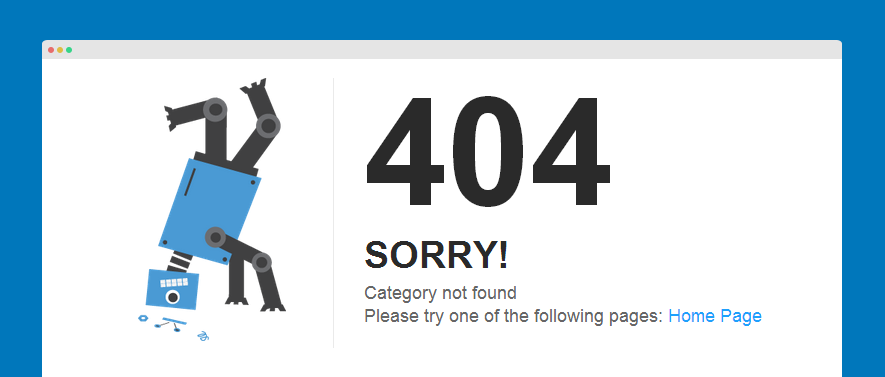
1.重写404页
通常,每个模板都是自己的404页的样式。如果你想定制,这将引导您通过快速入门:
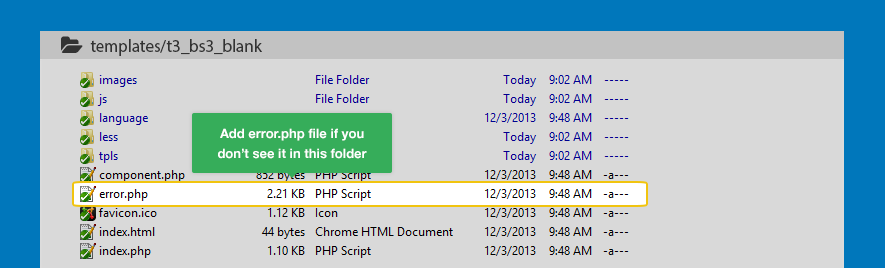
步骤1:添加文件error.php
要添加文件的最好方式是复制默认Joomla templates/system error.php文件然后复制到templates/t3_bs3_blank/
步骤2:自定义404页
打开此文件并按照您希望的页面自定义。
你的CSS文件的页面将使用定义。
- <link rel="stylesheet" href="/<?php echo $this->baseurl ?>/templates/<?php echo $this->template ?>/css/error.css" type="text/css" />
您可以创建新的CSS文件,404页,但我们建议复制默认Joomla error.css templates/system/css/ CSS然后粘贴到templates/t3_bs3_blank/css/。打开文件并开始自定义。
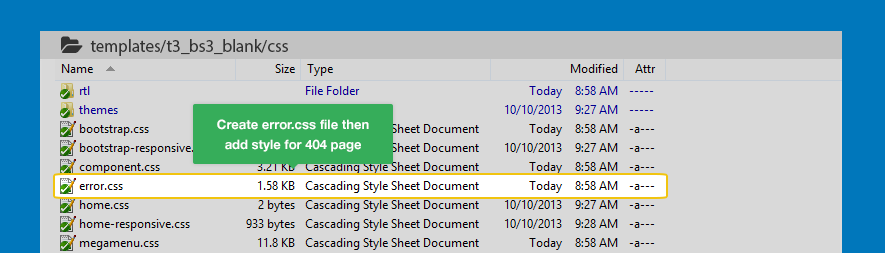
一件事是,每个主题可以使用不同的CSS文件,使其具有不同的风格。
- <?php if($theme && is_file(T3_TEMPLATE_PATH . '/css/themes/' . $theme . '/error.css')):?>
- <link rel="stylesheet" href="/<?php echo $this->baseurl ?>/templates/<?php echo $this->template ?>/css/themes/<?php echo $theme ?>/error.css" type="text/css" />
- <?php endif; ?>
- <?php
- /**
- * @package Joomla.Site
- * @copyright Copyright (C) 2005 - 2012 Open Source Matters, Inc. All rights reserved.
- * @license GNU General Public License version 2 or later; see LICENSE.txt
- */
- defined('_JEXEC') or die;
- if (!isset($this->error)) {
- $this->error = JError::raiseWarning(404, JText::_('JERROR_ALERTNOAUTHOR'));
- $this->debug = false;
- }
- //get language and direction
- $doc = JFactory::getDocument();
- $this->language = $doc->language;
- $this->direction = $doc->direction;
- $theme = JFactory::getApplication()->getTemplate(true)->params->get('theme', '');
- ?>
- <!DOCTYPE html PUBLIC "-//W3C//DTD XHTML 1.0 Transitional//EN" "http://www.w3.org/TR/xhtml1/DTD/xhtml1-transitional.dtd">
- <html xmlns="http://www.w3.org/1999/xhtml" xml:lang="<?php echo $this->language; ?>" lang="<?php echo $this->language; ?>" dir="<?php echo $this->direction; ?>">
- <head>
- <title><?php echo $this->error->getCode(); ?> - <?php echo $this->title; ?></title>
- <link rel="stylesheet" href="/<?php echo $this->baseurl ?>/templates/<?php echo $this->template ?>/css/error.css" type="text/css" />
- <?php if($theme && is_file(T3_TEMPLATE_PATH . '/css/themes/' . $theme . '/error.css')):?>
- <link rel="stylesheet" href="/<?php echo $this->baseurl ?>/templates/<?php echo $this->template ?>/css/themes/<?php echo $theme ?>/error.css" type="text/css" />
- <?php endif; ?>
- <link href='http://fonts.googleapis.com/css?family=Handlee' rel='stylesheet' type='text/css'>
- </head>
- <body class="page-error">
- <div class="error-page-wrap">
- <div class="inner">
- <div class="error-code"><?php echo $this->error->getCode(); ?></div>
- <div class="error-message">
- <h2>SORRY!</h2>
- <p>
- <?php echo $this->error->getMessage(); ?><br />
- <?php echo JText::_('JERROR_LAYOUT_PLEASE_TRY_ONE_OF_THE_FOLLOWING_PAGES'); ?> <a href="/<?php echo $this->baseurl; ?>/index.php" title="<?php echo JText::_('JERROR_LAYOUT_GO_TO_THE_HOME_PAGE'); ?>"><?php echo JText::_('JERROR_LAYOUT_HOME_PAGE'); ?></a>
- </p>
- </div>
- </div>
- </div>
- </body>
- </html>
在每个主题404网页的CSS文件位于templates/t3_bs3_blank/css/themes/theme_name/
注:
CSS文件不被当你编译less/CSS。
2。覆盖线下页
若要自定义脱机页,您只需要为您进行404页定制,就可以使用相同的过程.
步骤1:添加新的offline.php文件
复制文件offline.php文件夹templates/system然后粘贴到templates/t3_bs3_blank
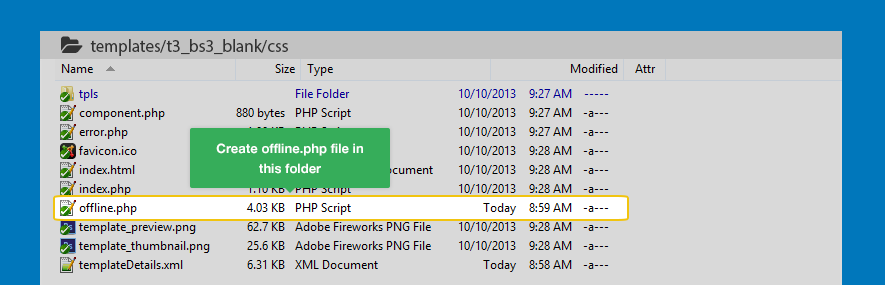
步骤2:自定义脱机页
打开此文件并根据需要脱机页自定义它。
你的CSS文件的页面将使用定义。
- <link rel="stylesheet" href="/<?php echo $this->baseurl ?>/templates/<?php echo $this->template ?>/css/offline.css" type="text/css" />
您可以创建新的脱机页CSS文件,但我们建议复制默认Joomla offline.css文件模板/系统/ CSS然后粘贴到templates/t3_bs3_blank/css/。
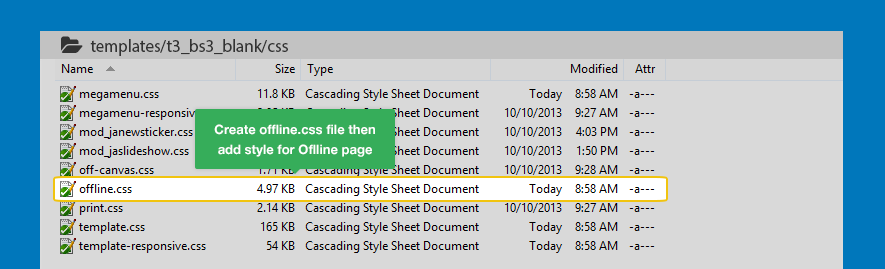
你可以定义每个主题使用一个CSS文件,每个主题都会有不同的风格为脱机页。
- <?php if($theme && is_file(T3_TEMPLATE_PATH . '/css/themes/' . $theme . '/offline.css')):?>
- <link rel="stylesheet" href="/<?php echo $this->baseurl ?>/templates/<?php echo $this->template ?>/css/themes/<?php echo $theme ?>/offline.css" type="text/css" />
- <?php endif; ?>
- <?php
- /**
- * $JA#COPYRIGHT$
- */
- defined('_JEXEC') or die;
- $app = JFactory::getApplication();
- $theme = JFactory::getApplication()->getTemplate(true)->params->get('theme', '');
- //check if t3 plugin is existed
- if(!defined('T3')){
- if (JError::$legacy) {
- JError::setErrorHandling(E_ERROR, 'die');
- JError::raiseError(500, JText::_('T3_MISSING_T3_PLUGIN'));
- exit;
- } else {
- throw new Exception(JText::_('T3_MISSING_T3_PLUGIN'), 500);
- }
- }
- $t3app = T3::getApp($this);
- ?>
- <!DOCTYPE html PUBLIC "-//W3C//DTD XHTML 1.0 Transitional//EN" "http://www.w3.org/TR/xhtml1/DTD/xhtml1-transitional.dtd">
- <html xmlns="http://www.w3.org/1999/xhtml" xml:lang="<?php echo $this->language; ?>" lang="<?php echo $this->language; ?>" dir="<?php echo $this->direction; ?>">
- <head>
- <jdoc:include type="head" />
- <link rel="stylesheet" href="/<?php echo $this->baseurl ?>/templates/<?php echo $this->template ?>/css/offline.css" type="text/css" />
- <?php if($theme && is_file(T3_TEMPLATE_PATH . '/css/themes/' . $theme . '/offline.css')):?>
- <link rel="stylesheet" href="/<?php echo $this->baseurl ?>/templates/<?php echo $this->template ?>/css/themes/<?php echo $theme ?>/offline.css" type="text/css" />
- <?php endif; ?>
- <?php
- // T3 BASE HEAD
- $t3app->addHead();?>
- </head>
- <body>
- <div id="frame" class="outline">
- <div class="offline-page">
- <?php if ($app->getCfg('offline_image') && file_exists($app->getCfg('offline_image'))) : ?>
- <img src="/<?php echo $app->getCfg('offline_image'); ?>" alt="<?php echo htmlspecialchars($app->getCfg('sitename')); ?>" />
- <?php endif; ?>
- <div class="brand">
- <a href="/\index.php" title="<?php echo htmlspecialchars($app->getCfg('sitename')); ?>"><?php echo htmlspecialchars($app->getCfg('sitename')); ?></a>
- </div>
- <div class="offline-message">
- <?php if ($app->getCfg('display_offline_message', 1) == 1 && str_replace(' ', '', $app->getCfg('offline_message')) != ''): ?>
- <p>
- <?php echo $app->getCfg('offline_message'); ?>
- </p>
- <?php elseif ($app->getCfg('display_offline_message', 1) == 2 && str_replace(' ', '', JText::_('JOFFLINE_MESSAGE')) != ''): ?>
- <p>
- <?php echo JText::_('JOFFLINE_MESSAGE'); ?>
- </p>
- <?php endif; ?>
- </div>
- <div class="login-form">
- <form action="<?php echo JRoute::_('index.php', true); ?>" method="post" id="form-login">
- <fieldset class="input">
- <div class="wrap-input">
- <p id="form-login-username">
- <input name="username" id="username" type="text" class="inputbox" alt="<?php echo JText::_('JGLOBAL_USERNAME') ?>" size="18" placeholder="<?php echo JText::_('JGLOBAL_USERNAME') ?>" />
- </p>
- <p id="form-login-password">
- <input type="password" name="password" class="inputbox" size="18" alt="<?php echo JText::_('JGLOBAL_PASSWORD') ?>" id="passwd" placeholder="<?php echo JText::_('JGLOBAL_PASSWORD') ?>" />
- </p>
- <?php if (count($twofactormethods) > 1) : ?>
- <p id="form-login-secretkey">
- <label for="secretkey"><?php echo JText::_('JGLOBAL_SECRETKEY') ?></label>
- <input type="text" name="secretkey" class="inputbox" size="18" alt="<?php echo JText::_('JGLOBAL_SECRETKEY') ?>" id="secretkey" />
- </p>
- <?php endif; ?>
- </div>
- <?php if (JPluginHelper::isEnabled('system', 'remember')) : ?>
- <p id="form-login-remember">
- <input type="checkbox" name="remember" class="inputbox" value="yes" alt="<?php echo JText::_('JGLOBAL_REMEMBER_ME') ?>" id="remember" />
- <label for="remember"><?php echo JText::_('JGLOBAL_REMEMBER_ME') ?></label>
- <input type="submit" name="Submit" class="button" value="<?php echo JText::_('JLOGIN') ?>" />
- </p>
- <?php endif; ?>
- <input type="hidden" name="option" value="com_users" />
- <input type="hidden" name="task" value="user.login" />
- <input type="hidden" name="return" value="<?php echo base64_encode(JURI::base()) ?>" />
- <?php echo JHtml::_('form.token'); ?>
- </fieldset>
- </form>
- <jdoc:include type="message" />
- </div>
- </div>
- </div>
- </body>
- </html>
在每个主题的CSS文件的脱机页位于templates/t3_bs3_blank/css/themes/theme_name/
注:
CSS文件不被当你编译less/CSS。
添加“回顶”按钮 “回到顶部”
按钮允许您快速导航到您的网站的顶部。
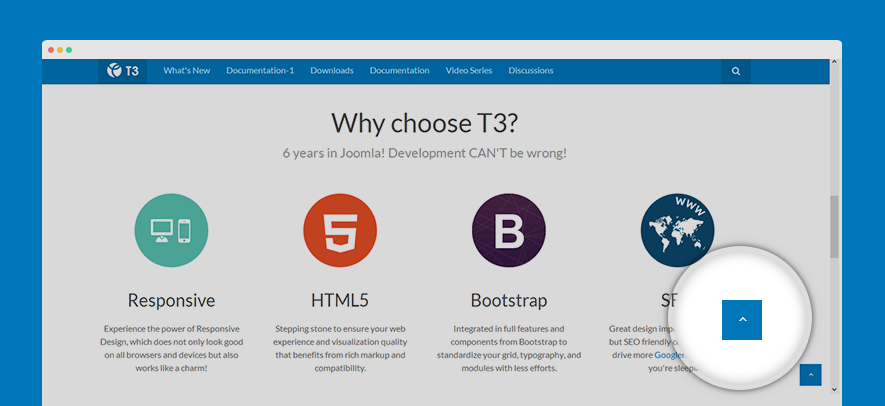
步骤1:启用“回顶”按钮
在你的网站上添加这个按钮,打开的文件templates/t3_bs3_blank/tpls/blocks/footer.php然后将下面的代码添加到文件。
- <!-- BACK TOP TOP BUTTON -->
- <div id="back-to-top" data-spy="affix" data-offset-top="300" class="back-to-top hidden-xs hidden-sm affix-top">
- <button class="btn btn-primary" title="Back to Top"><i class="fa fa-angle-up"></i></button>
- </div>
- <script type="text/javascript">
- (function($) {
- // Back to top
- $('#back-to-top').on('click', function(){
- $("html, body").animate({scrollTop: 0}, 500);
- return false;
- });
- })(jQuery);
- </script>
- <!-- BACK TO TOP BUTTON -->
步骤2:样式“回顶”按钮
打开templates/t3_bs3_blank/less/style.less然后添加样式规则:
- // Back to Top
- // -----------
- #back-to-top {
- position: fixed;
- right: @t3-global-margin;
- top: auto;
- z-index: 999;
- display: none;
- bottom: -60px;
- @media (min-width: @screen-sm-min) {
- display: block;
- }
- .btn {
- background: none;
- border: 2px solid @brand-primary;
- color: @brand-primary;
- height: 40px;
- width: 40px;
- border-radius: 50%;
- line-height: 1;
- padding: 0;
- text-align: center;
- .opacity(0.7);
- .transition(0.2s);
- &:hover, &:active, &:focus {
- background: none;
- outline: none;
- .opacity(1);
- }
- }
- &.affix {
- bottom: @t3-global-margin * 2;
- }
- a {
- outline: none;
- }
- i {
- font-size: @font-size-large + 10;
- line-height: 22px;
- }
- }
多语种megamenu
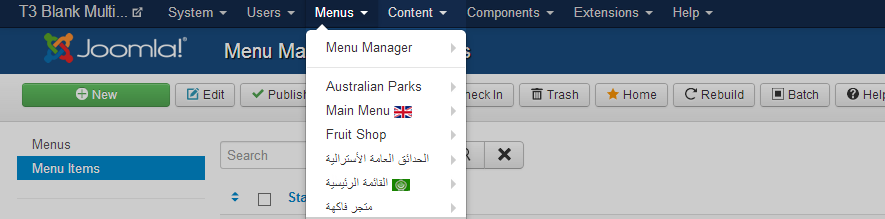
T3框架支持megamenu,当你运行一个多语种的网站,你需要配置多语言megamenu。按照本指南,使其工作。
请确保建立多语种网站的所有步骤都完成。如果这些步骤不做的还不够,有2种方法来建立一个多语种的网站:手动设置或自动设置与JA多语种构件。这取决于你去哪一种方式。
创建语言菜单
步骤1:创建语言菜单
对于每种语言,您需要创建一个基于默认语言菜单系统的菜单系统.。例如,你的网站是目前2种语言:英语和阿拉伯语。那么你应该创建基于现有阿拉伯语英语菜单菜单。
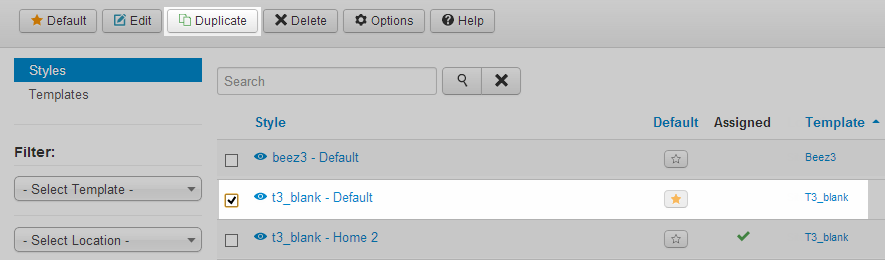
步骤2:复制默认模板样式
转到“扩展”模板管理器,然后复制默认模板样式。
步骤3:重命名和指定复制模板样式的语言
接下来,打开重复的模板样式来重命名它。然后分配到所需的语言。

步骤4:指定菜单megamenu
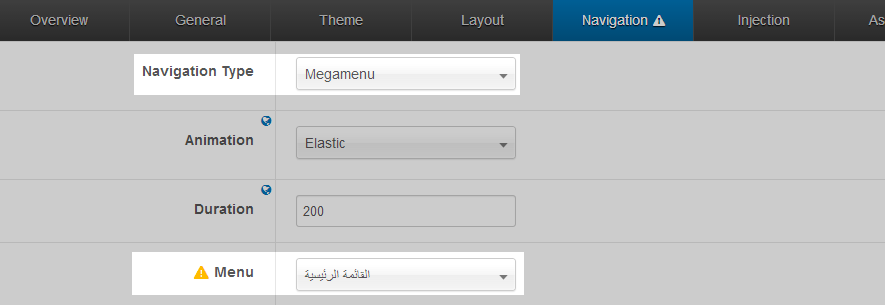
现在打开导航标签,使megamenu然后创建菜单菜单中的领域。
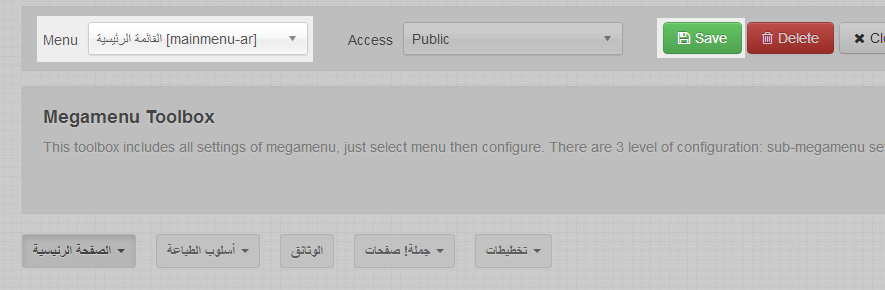
步骤5:Save Mengamenu设置
现在你要做的就是拯救megamenu设置,请记住,这一步是即使你没有改变任何东西,因为它的目的是检测你的megamenu要求。
打开megamenu设置面板,然后确保你选择阿拉伯语的右键菜单-主菜单。
多实例megamenu
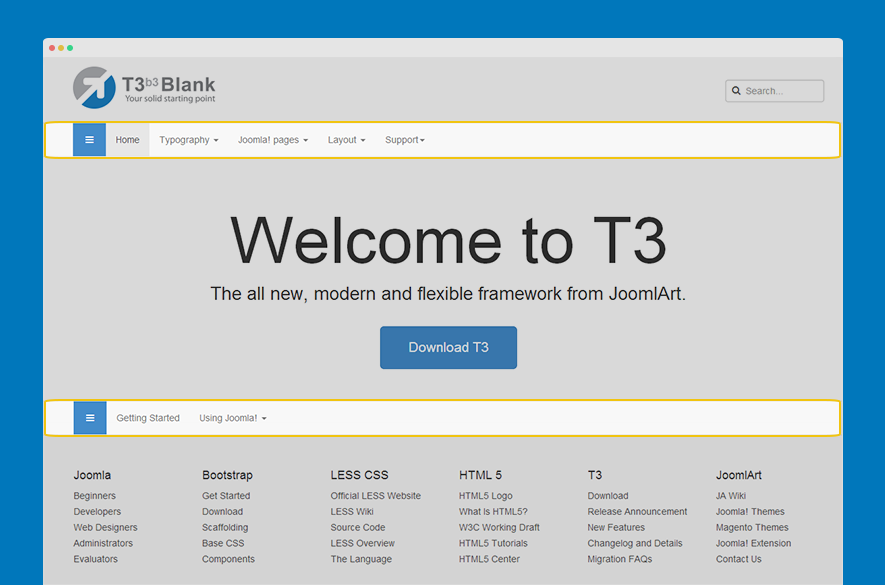
T3框架允许你为Megamenu创建的多个实例。在写这篇文章,我们将创建主菜单和网站顶部菜单megamenu。
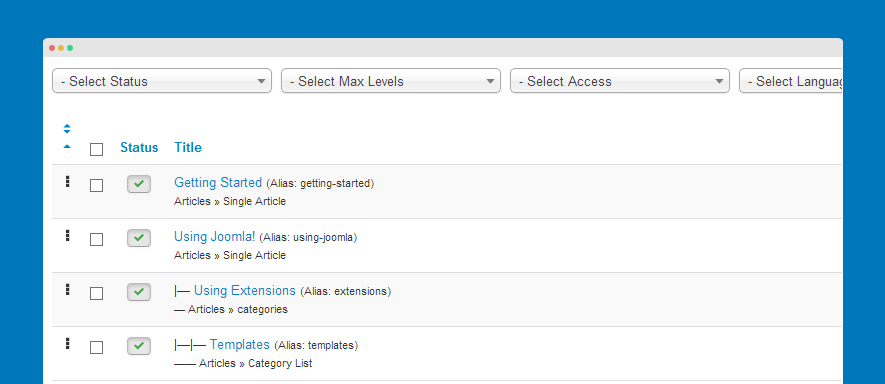
步骤1:创建主菜单和topmenu
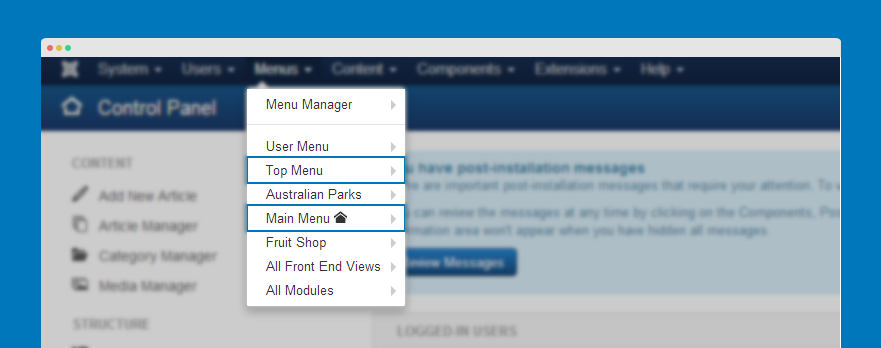
步骤2:创建主菜单和菜单项topmenu
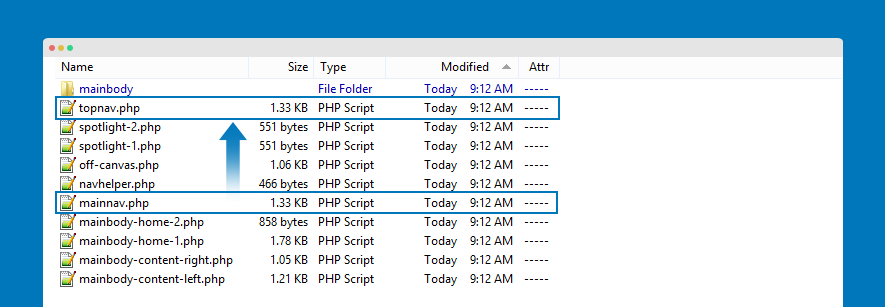
步骤3:创建topnav.php文件
在templates/t3_bs3_blank/tpls/blocks然后重命名为topnav.php。
步骤4:自定义mainnav.php文件
打开mainnav.php文件然后改变:
Find the code
- data-target=".t3-navbar-collapse"
- data-target=".t3-navbar-mainmenu"
“主菜单”是主菜单的菜单类型名称。
添加类T3导航栏菜单
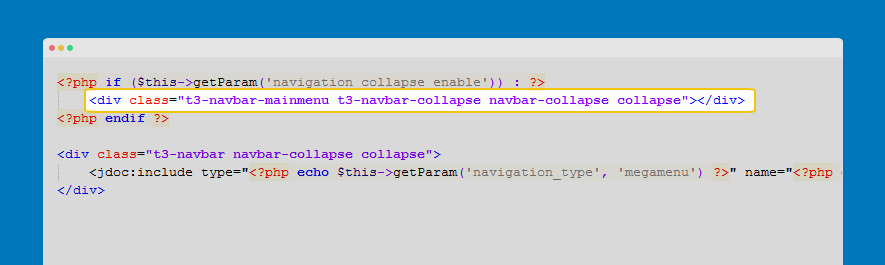
Find the code
- <div class="t3-navbar-collapse navbar-collapse collapse"></div>
- <div class="t3-navbar-mainmenu t3-navbar-collapse navbar-collapse collapse"></div>
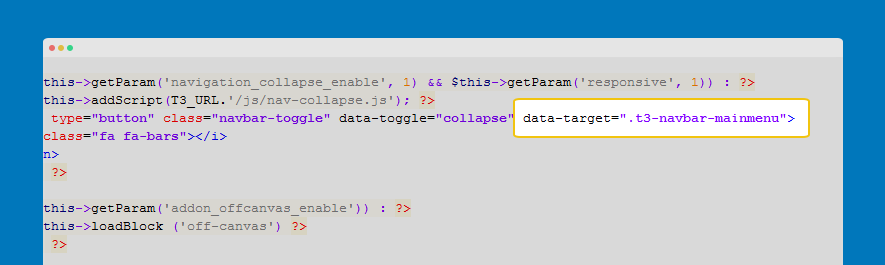
步骤5:自定义topnav.php文件
打开topnav.php文件然后替换下面的代码。
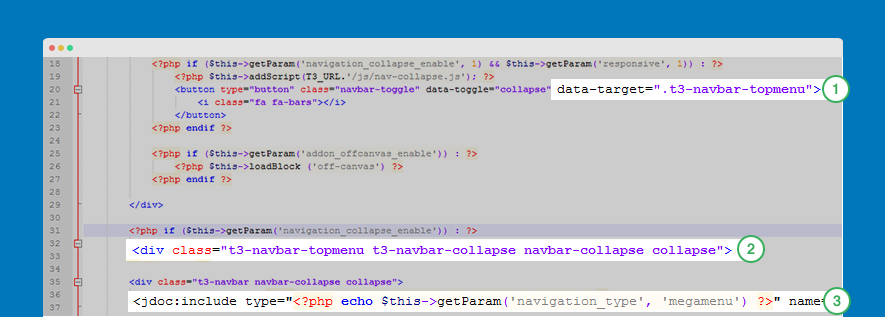
Find the code
- data-target=".t3-navbar-collapse"
Replace with:
- data-target=".t3-navbar-topmenu"
- <div class="t3-navbar-collapse navbar-collapse collapse"></div
- <div class="t3-navbar-topmenu t3-navbar-collapse navbar-collapse collapse"></div>
- <jdoc:include type="<?php echo $this->getParam('navigation_type', 'megamenu') ?>" name="<?php echo $this->getParam('mm_type', 'mainmenu') ?>" />
- <jdoc:include type="<?php echo $this->getParam('navigation_type', 'megamenu') ?>" name="'topmenu" menutype="topmenu" />
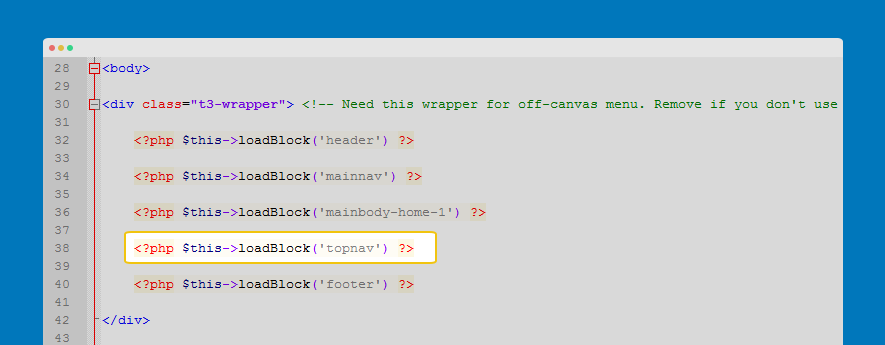
步骤6:loadblock topmenu
打开文件home-1.php或default.php templates/t3_bs3_blank/tpls。
- <?php $this->loadBlock ('topnav') ?>